ML Model 🏗️🤖📈
Bring all your ML skills together into one complete pipeline — data, split, train, predict, and evaluate. Five lines of code. Your first real working model.
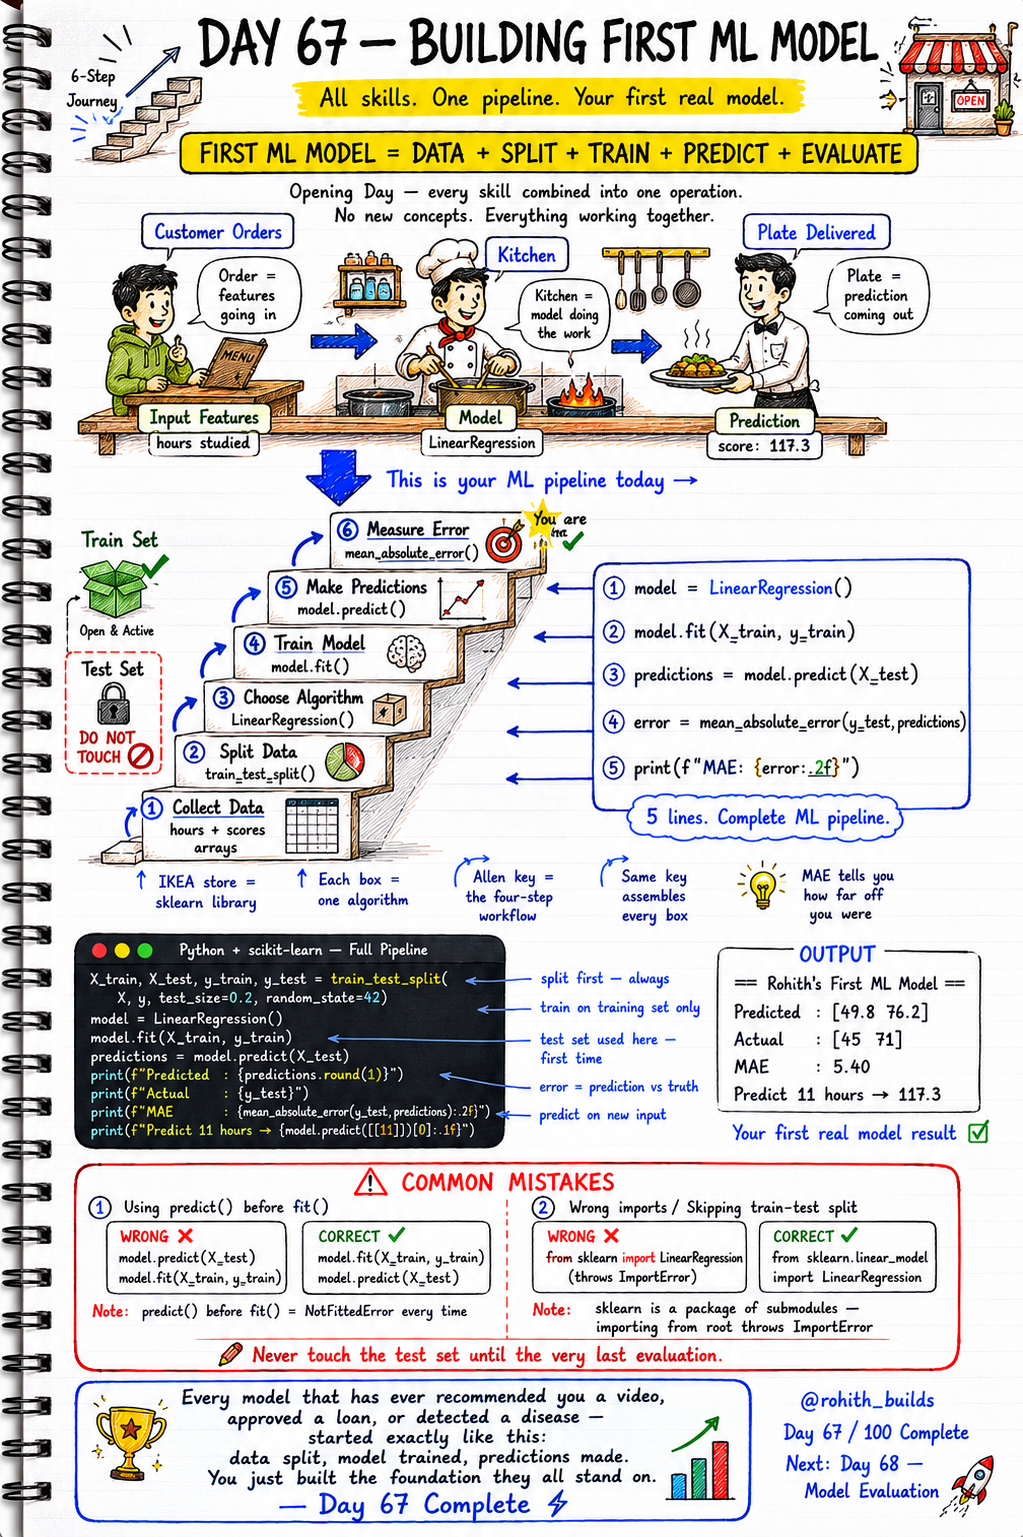
Day 67: Building Your First ML Model
Why Should I Care?
Every model that has ever recommended you a YouTube video, approved a loan, or detected a disease started exactly like this. Data collected. Data split. Model trained. Predictions made. Error measured. You have learned every single piece separately. Today you snap them all together into one real working pipeline. This is not a practice exercise — this is the exact foundation that every ML engineer at Google, Amazon, and Netflix builds on. After today, you are no longer learning about ML. You are doing it.
Core Concept
Think of your ML pipeline like a restaurant. The customer order is your input features — hours studied, distance, price. The kitchen is your model — it does the work invisibly. The plate that comes out is your prediction — a number, a label, a decision. Your job as the ML engineer is to build the kitchen, train the chef, and measure how accurate the food is. The six-step pipeline is: Collect Data, Split Data, Choose Algorithm, Train Model, Make Predictions, Measure Error. No new concepts today — everything working together for the first time.
How It Works
Step 1 — Collect your data as arrays. Step 2 — Split into train and test sets using train_test_split. The test set is locked — do not touch it until the very end. Step 3 — Choose your algorithm and instantiate it. Step 4 — Train the model with fit() on the training set only. Step 5 — Make predictions with predict() on the test set. Step 6 — Measure how far off you were using mean_absolute_error. Five lines of code. One complete ML pipeline.
import numpy as np
from sklearn.linear_model import LinearRegression
from sklearn.model_selection import train_test_split
from sklearn.metrics import mean_absolute_error

# Step 1: Collect Data
X = np.array([[1],[2],[3],[4],[5],[6],[7],[8],[9],[10]])
y = np.array([20, 30, 35, 45, 55, 60, 68, 75, 80, 90])

# Step 2: Split Data — test set is locked until the very end
X_train, X_test, y_train, y_test = train_test_split(
    X, y, test_size=0.2, random_state=42
)

# Step 3 + 4: Choose Algorithm and Train
model = LinearRegression()
model.fit(X_train, y_train)

# Step 5: Make Predictions
predictions = model.predict(X_test)

# Step 6: Measure Error
error = mean_absolute_error(y_test, predictions)

print(f"Predicted : {predictions.round(1)}")
print(f"Actual    : {y_test}")
print(f"MAE       : {error:.2f}")
Real World Connection
Think about how Zomato predicts your delivery time. Step 1 — they collect data: distance, traffic, restaurant prep time, weather. Step 2 — they split it: most data trains the model, a small chunk tests it. Step 3 — they pick an algorithm. Step 4 — they train it on millions of past deliveries. Step 5 — they predict your delivery time right now. Step 6 — they measure how accurate those predictions were and keep improving. CRED uses the same pipeline to predict your credit score. PUBG uses it to detect cheaters. PhonePe uses it to flag fraud. You just built the foundation they all stand on.
Examples
import numpy as np
from sklearn.linear_model import LinearRegression
from sklearn.model_selection import train_test_split
from sklearn.metrics import mean_absolute_error

X = np.array([[1],[2],[3],[4],[5],[6],[7],[8],[9],[10]])
y = np.array([20, 30, 35, 45, 55, 60, 68, 75, 80, 90])

X_train, X_test, y_train, y_test = train_test_split(
    X, y, test_size=0.2, random_state=42
)

model = LinearRegression()
model.fit(X_train, y_train)

predictions = model.predict(X_test)
error = mean_absolute_error(y_test, predictions)

print("== Rohith''s First ML Model ==")
print(f"Predicted : {predictions.round(1)}")
print(f"Actual    : {y_test}")
print(f"MAE       : {error:.2f}")

# Predict on a brand new input never seen before
new_prediction = model.predict([[11]])[0]
print(f"Predict 11 hours -> {new_prediction:.1f}")

# Output:
# == Rohith''s First ML Model ==
# Predicted : [49.8 76.2]
# Actual    : [45 71]
# MAE       : 5.40
# Predict 11 hours -> 117.3
Common Mistakes
Two mistakes destroy your first model every time. First — calling predict() before fit(). The model has learned nothing yet and throws a NotFittedError. Second — importing from the sklearn root instead of the correct submodule. Both are one-line fixes once you know them. And the golden rule that every ML engineer follows: never touch the test set until the very last evaluation step.
# WRONG - predict() before fit()
model.predict(X_test)
model.fit(X_train, y_train)
# NotFittedError — model has not learned anything yet
# predict() before fit() fails every single time

# CORRECT - fit() first, always
model.fit(X_train, y_train)
model.predict(X_test)
# Train first. Predict second. No exceptions.

# ------------------------------------------

# WRONG - Importing from the sklearn root
from sklearn import LinearRegression
# ImportError — LinearRegression is not at the root level

# CORRECT - Import from the right submodule
from sklearn.linear_model import LinearRegression
# sklearn is a package of submodules — always use the full path

# ------------------------------------------

# GOLDEN RULE
# Never touch X_test or y_test until Step 5 and 6.
# Using test data during training = cheating your own model.
Mini Challenge
Mini Challenge
Build a complete 6-step ML pipeline to predict a student''s exam score based on hours of sleep the night before. Create 10 data points where more sleep generally leads to better scores. Split the data, train a LinearRegression model, predict on the test set, and print the MAE. Then predict the score for a student who slept exactly 9 hours. Print a clean output showing Predicted, Actual, MAE, and your new prediction — just like the Rohith''s First ML Model example above.
Quick Quiz
Q: What are the six steps of a complete ML pipeline in order?
A: Collect Data, Split Data, Choose Algorithm, Train Model, Make Predictions, Measure Error — always in this order.
Q: Why is the test set locked and marked do not touch until the very end?
A: The test set simulates brand new real-world data the model has never seen. Using it during training would give a fake accuracy score — your model would cheat its own evaluation.
Q: What does MAE tell you about your model?
A: MAE is the average gap between what your model predicted and the actual correct values. A MAE of 5.40 means predictions are off by about 5.40 units on average — lower is always better.
Bonus Knowledge
The pipeline you built today is called a supervised learning pipeline — you train on data where the correct answers are already known. The opposite is unsupervised learning — where there are no labels and the model finds patterns by itself, like grouping customers by behaviour. Also — MAE is just one way to measure error. Another common one is RMSE (Root Mean Squared Error), which punishes big mistakes more heavily. As your models grow more complex, you will also hear about accuracy score for classifiers and R-squared for regression. But every single one of those advanced metrics plugs into this same six-step pipeline you built today. The foundation never changes.
Key Takeaways
Key Takeaways
- A complete ML pipeline has six steps: Collect, Split, Choose Algorithm, Train, Predict, Evaluate.
- train_test_split divides your data — training set is open, test set is locked until the very end.
- model.fit() trains the model on the training set only — never on the test set.
- model.predict() uses what the model learned to make predictions on new, unseen data.
- mean_absolute_error measures the average gap between predictions and actual values — lower is better.
- Always call fit() before predict() — predict() before fit() throws NotFittedError every time.
- Always import from the correct sklearn submodule path — never from the sklearn root directly.
- Every real ML model at YouTube, Amazon, Zomato, and PUBG starts with this exact six-step pipeline.
Continue Learning with Rohi
You've used your 3 free Rohi questions. Create a free account to continue learning.